1. About this manual
You are reading the manual for Willow, a Python framework for experimental economics developed at the Center for the Study of Neuroeconomics at George Mason University. This manual presumes that you already have an understanding of experimental economics, of HTML, and of Python programming.
If you are interested in learning about experimental economics, you could do worse than to have a look at the following textbooks:
-
Daniel Friedman, Experimental Methods: A Primer for Economists
-
John Kagel and Alvin Roth, The Handbook of Experimental Economics
In order to get started with Python if you already know how to program in some other language, you can try
-
Mark Pilgrim, Dive into Python http://diveintopython.org
-
Guido van Rossum et al., The Python Tutorial http://docs.python.org/tutorial/
If you want to learn both the craft of computer programming and the Python programming language at the same time, you are in luck, since Python is an excellent first language. Some free resources include:
-
Jeffrey Elkner, Allen B. Downey, and Chris Meyers, How to Think Like a Computer Scientist http://openbookproject.net/thinkCSpy/
-
Swaroop C. H., A Byte of Python http://www.swaroopch.com/notes/Python
Also, in order to use Willow, you need to have basic knowledge of HTML and CSS, the languages used to build web pages. For this I strongly recommend
-
Kennedy and Musciano, HTML & XHTML, The Definitive Guide, O’Reilly.
O’Reilly books are available full-text through an online service called Safari, which many universities subscribe to. In particular, if you are at GMU, you can get Safari at http://proquest.safaribooksonline.com.mutex.gmu.edu/?uicode=viva and you can this book at http://proquest.safaribooksonline.com.mutex.gmu.edu/0596527322 . If you are at some other institution, try your library web site listing of online databases.
2. Why Willow?
Willow is a tool for making the kinds of computer user interfaces typically used in experimental economics. Without Willow, you might design such an interface from scratch, or by modifying earlier from-scratch software written for similar experiments. Using Willow, you can do the same thing, but faster and better.
Willow sets out to accomplish this goal not by providing canned routines for commonly performed experiments. After all, it is precisely because our experiments are different from what has gone before that we bother with them. Rather, Willow is a generic toolkit that makes a lot of the things we do in experimental economics easy.
To use a Willow program, you need only install your program on a single "monitor" computer. The computers used by your research subjects will simply run a web browser, which connects to a web server that runs on the monitor computer. The user interface for the subjects will be displayed inside the browser window.
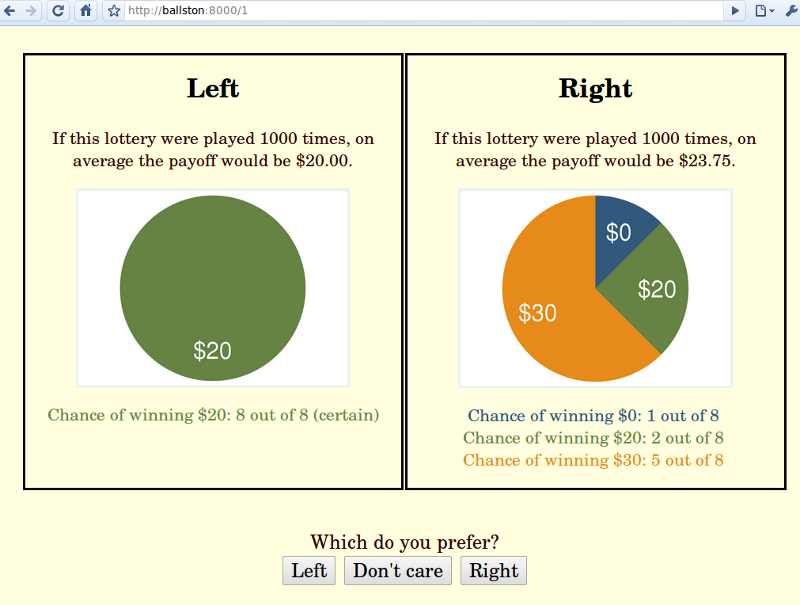
Willow is a versatile program, and you can use it for many different interfaces; but you might just be curious what a Willow interface can look like. Here are some examples taken from the first study that used Willow at the Center for the Study of Neuroeconomics and the Interdisciplinary Center for Economic Science at George Mason University.
3. Reading this manual
In this manual, I will use fixed-width font to indicate anything that is literally part of some HTML, CSS or Python code. For longer snippets of code, I will use boxes, like so:
import random
print random.random()
Note that there are colors in these boxes, which are merely a typesetting convention to make it easier to read the code. Similarly, you may find that many of the better programmer’s text editors will color your code in a similar (but not identical) way. Again, the colors are not part of the code, and they are not actually stored in your code files, as you can easily verify by opening them up in a less fancy text editor.
4. Preliminary 1: HTML
Willow relies on HTML, the hypertext markup language, for the purpose of constructing a user interface. A complete description of HTML is outside the scope of this manual, but I’ll give a brief introduction.
An HTML document is a text file with some special markup sequences. To practice with HTML, you can construct HTML documents with a text editor, and load them in a web browser.
Consider this example:
<p>This is a paragraph, with a <b>bold</b> bit in it, and a <br>line
break and a <a href="http://google.com">link</a>.</p>

<ol>
 <li>This is         the first item of an ordered list.</li>
 <li>This is the second        item of an ordered list.</li>
</ol>
<ul>
 <li>This is the first item of an unordered list. </li>
 <li>This is the second item of an unordered list.</li>
</ul>

<div>This is a div. It has a <span>span</span> in it.</div>
<div>This is a div. It has another <span>span</span> in it.</div>
If we type this into a file called example.html and load that file in a web browser, this is what we see:

Even though this is a simple example, it already illustrates some of the most important points about HTML:
-
HTML is made up of elements, which are delimited by tags. For instance, the above example starts with a p element, the start of which is marked with an opening tag <p>, and the end of which is marked with a closing tag </p>.
-
Elements can have contents. For example, the b element in the above example contains the text bold.
-
Some elements, such as br, do not have contents, and those do not need a closing tag. (Sometimes, you will see these written like <br />; this is an XML thing, which you can read about elsewhere.)
-
Elements also can have attributes. In the above example, the a element has an href attribute, with value http://google.com.
-
In HTML, any sequence of newline characters and/or blank characters is always treated as a single blank. Extra blanks, or newlines, in the HTML source have no effect. If you do want a line break, you can use the the HTML element <br>.
-
Most HTML elements have standard meanings for the browser. The b element is rendered by typesetting its contents in bold, the a element describes a link, etc. Strictly speaking, many of these meanings are not part of the HTML standard, but in practice, they are pretty consistent across browsers. There are two exceptions to the rule that each HTML element has a standard meaning: div and span. These have no inherent meaning, and only become useful when we start using things like CSS. The difference between div and span is that a div is typeset above/below whatever comes before/after it, while a span is typeset in-line.
Next, we will see a list of common HTML elements.
- <p>…</p>
-
A paragraph.
- <ul>…</ul>
-
An unordered (bulleted) list.
- <ol>…</ol>
-
An ordered (numbered) list.
- <li>…</li>
-
An item for a list.
- <div>…</div>
-
A generic chunk of text displayed vertically.
- <input>
-
An input widget
- <b>…</b>
-
A piece of text in bold
- <i>…</i>
-
A piece of text in italics
- <span>…</span>
-
A generic chunk of text displayed in-line.
- <a>…</a>
-
A link
- <br>
-
A line break
- <hr>
-
A horizontal line
- <table>
-
A table
- <tr>
-
A table row
- <td>
-
A table element
The last three of these fit together like so:
<table>
<tr><td>Column 1, Row 1</td><td>Column 2, Row 1</td></tr>
<tr><td>Column 1, Row 2</td><td>Column 2, Row 2</td></tr>
</table>
Some of the more common HTML attributes:
- <table border=1>…</table>
-
A table with 1 pixel borders.
- <a href="http://google.com/">…</a>
-
A link to http://google.com/
- <input type=submit value=foo>
-
A button with label foo
- <input type=text>
-
A text field.
You can learn more about HTML by using either Firefox with the Firebug plugin, or Google Chrome. Right-click anywhere on the page and select "Inspect element." This pulls up an HTML explorer system, which looks like this in Google Chrome (Firefox with the Firebug plugin is similar):
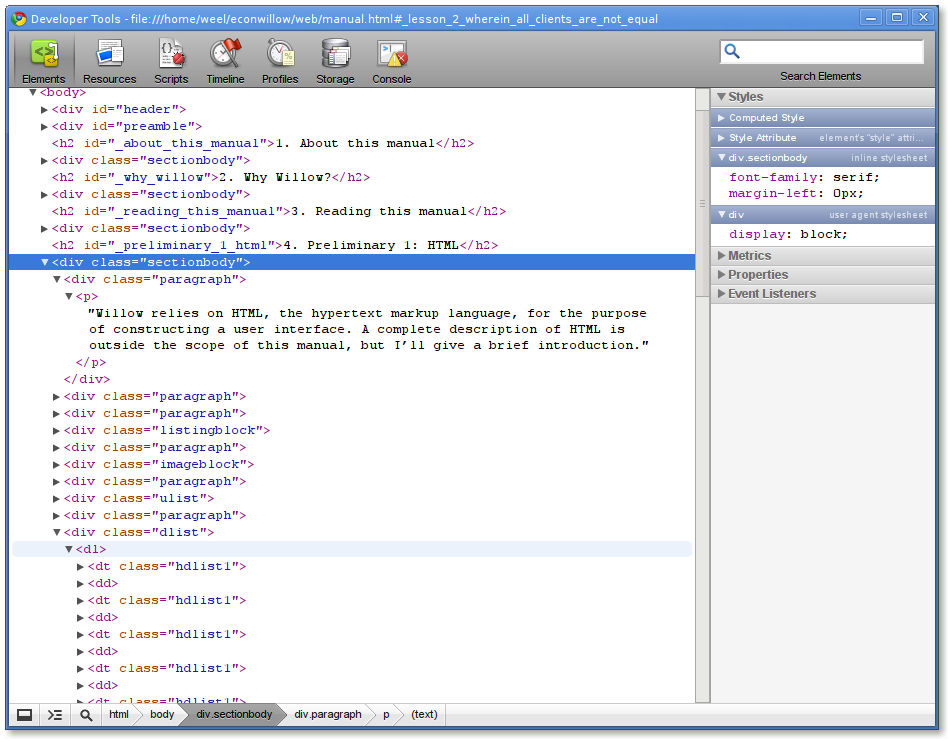
By playing around with this feature of your browser, you can learn a lot of about HTML and CSS.
5. Preliminary 2: CSS
TBA
6. Preliminary 3: Some Python features
You should already know Python before reading this manual, but there are few Python features that you may not be familiar with even if you do have experience with Python and that will come in useful for Willow.
Python has a convenient way of putting together strings with the % operator.
print "foo %s baz" % ("bar",)
print "foo %s baz %%" % ("bar",)
print "foo %s baz %s" % ("bar", "quux")
print "foo %s baz %s" % ("bar", 42)
print "foo %s baz" % "bar"
If you run that through Python, you will see
foo bar baz
foo bar baz %
foo bar baz quux
foo bar baz 42
foo bar baz
As you can see, the % operator takes a string, called the "format string", on its left hand side, and a tuple on its right hand side. For every "gap" in the format string, indicated by %s, the corresponding element from the tuple will be substituted.
In fact, there are a number of gap markers other than %s (such as %d, %r, etc.) which are described in the "String Formatting Operations" section in the "Built-in Types" chapter of the Python library documentation. In practice, %s is nearly always what you want. If you happen to actually want a percent sign in your string, you should use %%.
Also, if you only have one value to substitute, you don’t need to put it in a one-element tuple; the % operator is nice enough to accept interpret non-tuple values as though they were one-element tuples.
7. Lesson 0: Wherein we install Willow
To install Willow, you extract the zip file to a convenient location. You will do this anew for each of your Willow projects. In addition, you will need to have Python installed. Willow has been tested using Python 2.6 on Ubuntu GNU/Linux. You should be able to use it with Python 2.6 on Windows and Mac OSX as well. If you do not have Python 2.6 on your computer, get it from http://www.python.org/download/releases/2.6.3/ and then come back. If you are not sure whether you have Python 2.6 on your computer, just move on to the next section of the manual. If things don’t work, you’ll notice soon enough, and you can go back and install Python. Do not use Python version 3. It will not work.
While programming, you will want to run Willow from within a programmer’s text editor (or, if you care for such things, an Integrated Development Environment). On Mac and Linux, you can use the IDLE editor that ships with Python. If you are running Windows, the version of IDLE that ships with Python on that platform is very buggy, and I recommend strongly that you get a different text editor: in particular, I recommend SciTE, which is a very simple drop-in replacement for IDLE. On Mac or Linux, you can get away with just using IDLE, although you may find that SciTE is a little more polished. Either way, SciTE can be had from http://www.scintilla.org/SciTE.html .
8. Lesson 1: Wherein we meet Willow
In the Willow folder, you will find a file named lesson.01. You need to run this file: double click on it, or run the command python lesson01.py from the command line. Once the lesson01.py program is running, fire up a web browser and point it to http://localhost:8000/. You should see a page that looks like so:

Now pull up the lesson01.py file in IDLE or SciTE.
In IDLE, this looks like so:
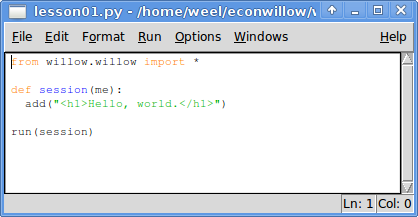
In Scite, it looks like:
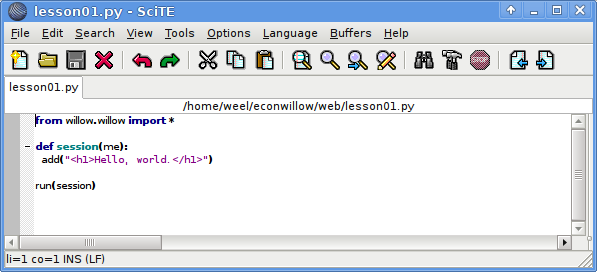
See here the code of a very simple but working Willow program. You can run it using the Run > Run Module menu option in IDLE or the Tools > Go menu in SciTE, or by pressing F5 (that shortcut key is the same in both SciTE and IDLE).
Again, you now need to point a web browser to http://localhost:8000.
If you see an error message like "address already in use," you are probably trying to run two instances of Willow simultaneously. You should stop the first one first (just close the window).
Now, let us look at the above code. Most of it is boilerplate, but the good news is that this is all the boilerplate you need. The first line imports the willow library. It assumes that willow.py is in a subdirectory willow of the directory in which lesson01.py is; this is how things are set up for the sample programs, and if you put your own programs in the same place, it will just work. The next two lines define a session function, and the last line instructs Willow to start the web server, using the session function that has just been defined.
Together, these four lines define a web server that you can connect to from a browser. If the browser is running on the same machine as the server, you can use http://localhost:8000 as a URL. If it is running somewhere else, you must find out the IP address of the server. (If you don’t know it, there is a whole chapter further down in the manual about how to figure it out.) If the IP address is, say, 123.123.123.123, then you can reach your Willow server using http://123.123.123.123:8000. The :8000 part is called the port number; you can specify a different port number as an extra argument to run (e.g. run(session, 8001)) if you insist on a port different from 8000.
Once the web server is running, for each client that connects to it, the session function will be called once. It will keep running until it returns. We say that each session function runs in its own "session thread". This means that several "copies" of the session function are running simultaneously, one for each client.
In this case, we want to simply display the text "Hello world." in the web browser of every client that connects, so we have a very simple session function that does nothing but add("<h1>Hello, world.</h1>"). The add() function adds an HTML snippet to the web page being displayed in the client’s browser.
Try connecting to localhost:8000 in multiple browser tabs. You’ll see that each one shows "Hello, world." This is because the session() function gets called once for each client that connects.
9. Lesson 2: Wherein all clients are not equal
In real applications, we usually do not want to do the same for every client that connects. More likely, we’ll want one client to show some sort of experimenter console, one client to show the interface for subject 1, one client the interface for subject 2, etc.
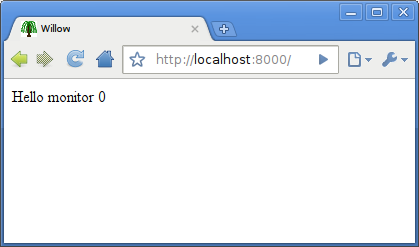
Have a look at lesson02.py:
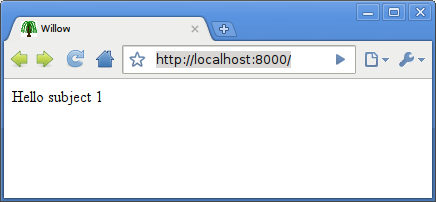
from willow.willow import *

def session(me):
  if me == 0:
      add("Hello monitor %s" % me)
  else:
      add("Hello subject %s" % me)

run(session)
|
|
The % operator in Python is very useful for constructing strings. You can read about it in section 6.6.2, "String Formatting Operations", of the Python 2.6.4 Standard Library reference manual. |
As you can see, there is still only one session() function, and for each client that connects, a session thread is started that runs the session() function. Each client runs the exact same function, but… the session function takes an argument, which we call me, and for each client, it gets called with a different value for me: 0, 1, 2, and so on. If you reload the page a bunch of times, it looks like this:

10. Lesson 3: Wherein we produce output
In this lesson, we will see some of the Willow functions for manipulating user interface elements. All of these are based on HTML and CSS, and it is crucial that you acquire a basic understanding of these languages. An extensive description of HTML and CSS is outside the scope of this manual.
Have a look at lesson03.py.
from willow.willow import *

def session(me):
    add("<style type='text/css'>.important { font-weight: bold; }</style>")
    add("<p>The <span class='important' id='a'>division</span> of "
        "<span class='b'>labor</span> is limited "
        "by the extent of the "
        "<a href='http://ebay.ocm'>market</a>.")
    add(" and subdivision", "#a")
    let("labour", ".b")
    poke("href", "http://ebay.com", "a")
    pop("important","#a")
    push("important",".b")
    add("<p class='elusive'>Microfoundations.</p>")
    add("<p class='hidden'>Prices.</p>")
    hide(".elusive")
    show(".hidden")

run(session)
This displays a web page like so:
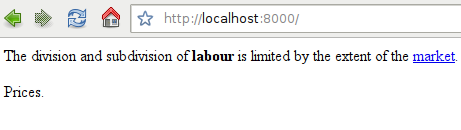
This shows off all of Willow’s UI manipulation functions. Let’s go through it line by line.
add("<style type='text/css'>.important { font-weight: bold; }</style>")
First we add a style sheet to the page. Again, CSS is beyond the scope of this manual and you should go out and read up on it, but what this comes down to is that we instruct the browser to typeset in bold all HTML elements that have class "important" turned on.
add("<p>The <span class='important' id='a'>division</span> of "
    "<span class='b'>labor</span> is limited "
    "by the extent of the "
    "<a href='http://ebay.ocm>market</a>.")
Note that in Python string literal juxtaposition adds the string literals together, which makes for a convenient way of splitting long strings over several lines.
The <span> element in HTML has no default meaning, and without any style sheets or other manipulations, a piece of HTML enclosed in a <span> is exactly identical to the same piece of HTML not so enclosed. In the above fragment, we have two <span> elementss. Note that because the style sheet instructed the browser to print all elements of class important in bold, the word "division" is printed in bold; or at least, it would be, if we did not manipulate it further.
add(" and subdivision", "#a")
This shows that you can add text not just to the page as a whole, but also to particular elements. The optional second argument to add is a CSS selector. The most common CSS selectors are:
-
p, which refers to all <p> elements;
-
h1, which refers to all <h1> elements;
-
etc.;
-
.x, which refers to all elements with class=x;
-
#a, which refers to the first element with id=a.
Note that some selectors can refer to more than one element, and in that case, your HTML snippet gets added to all matching elements.
In this case, what we are asking Willow to do is to find the first HTML element with id=a and add the text " and subdivision" to the end of it it.
set("labour", ".b")
The set() function is just like the add() function except that instead of adding HTML to the end of some element, it replaces the entire contents of the element. In particular, set("") clears the entire page!
poke("href", "http://ebay.com", "a")
So far, we have seen the functions add and set that manipulate the contents of HTML elements. But HTML elements have attributes as well as contents. For instance, if you write <a href="foo">…</a>, you have created an <a> element with contents "…" and with an href attribute with value foo. The poke() function serves to manipulate attributes. In this case, we set the href attribute of every single <a> element on the page to be http://ebay.com.
pop("important","#a")
push("important",".b")
In HTML, a single element can have more than one class. You can write that as <p class=class1 class2>…</p>. The pop() and push() functions are there to remove a class from an element and to add a class to an element, respectively, without changing any other classes that the element might have.
add("<p class='elusive'>Microfoundations.</p>")
add("<p class='hidden'>Prices.</p>")
hide(".elusive")
show(".hidden")
The hide() and show() functions do just that: hide and show elements. Willow is set up so that any element with class hidden set is hidden by default and only shows up when you call show() on it.
So far, we have seen the Willow UI primitives: add, set, poke, push, pop, hide, and show. In combination with HTML and CSS, these primitives make a very powerful UI language.
11. Lesson 4: Wherein we chatter
Now that we have seen how to produce output on the client screens, you may be wondering how we can read input. But before we get to that, we will first discuss another important feature of Willow: its communication system.
Consider lesson04.py.
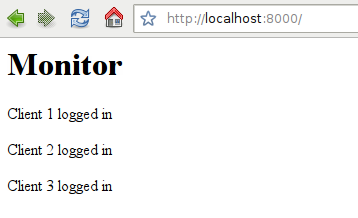
from willow.willow import *

def session(me):
  if me == 0:
    add("<h1>Monitor</h1>")
    while True:
      msg = take({"tag": "HELLO"})
      add("<p>Client %s logged in" % msg["number"])
  else:
    add(me)
    put({"tag": "HELLO", "number": me})

run(session)
In this short program, we can see a typical use case for the important Willow functions put() and take(). The first client, for which me==0, acts as a control panel that displays information about other clients coming online. In order to convey that information, each client other than the first puts a dictionary {"tag":"HELLO", "number":me} on the Board. The first client retrieves these dictionaries and uses them to display information about logins.
After the monitor client and 3 other clients have connected, the monitor client display would look like this:
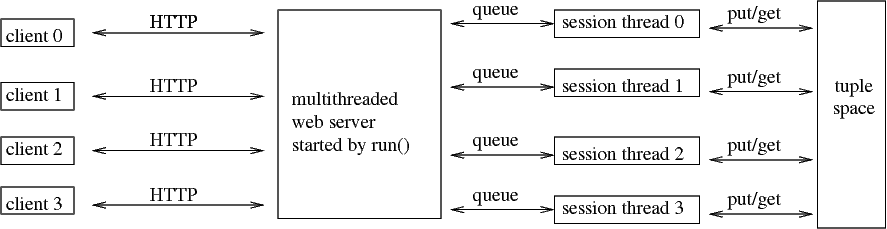
To fully understand this, we must understand the Board. The Board is the one and only data structure that is shared between the various session threads in Willow.
The board contains dictionaries. Dictionaries are sets of key-value pairs. To put my_dictionary on the board, you call put(my_dictionary). For instance, to put the empty dictionary {} on the board, you call put({}), or to put the very abridged Dutch-to-English dictionary {"rood":"red","nederlands":"dutch"} on the board, you call put({"rood":"red","nederlands":"dutch"}).
To retrieve my_dictionary from the board, you call take(my_dictionary). In practice, though, you typically don’t know yet what dictionary you want to retrieve. For that reason, take() allows you to leave out keys you aren’t sure of. In the extreme case, you leave out all keys and call take({}), which means "please retrieve any dictionary whatsoever from the board."
The take() function is blocking. This means that if there is no matching dictionary on the board, it will sit around waiting until one appears. This is what happens in the example code: the first thread (the one with me==0) sits around waiting for dictionaries of the form {"tag":"HELLO", …} to show up on the board. Every time one such dictionary shows up, the take() function returns it, the loop loops, and the take() function is called again, blocking until the next dictionary shows up.
When a dictionary is gotten with take(), it is removed from the board. Therefore, in the above code, you do not need to worry about looping around retrieving the same dictionary over and over again. If you want to retrieve a dictionary and leave it available (maybe for some other thread), you simply put it back on with put().
Another important trick in the use of take() is that you can specify more than one pattern. For instance, take({"tag":"HELLO"}, {"tag":"ERROR"}) blocks until either a dictionary with the key-value pair "tag":"HELLO" or a dictionary with the key-value pair "tag":"ERROR" shows up. take({"tag":"HELLO"}, {"foo":3}) blocks until either a dictionary with the key-value pair "tag":"HELLO" or a dictionary with the key-value pair "foo":3 shows up. And so on.
Finally, I will mention grab(). It is like take(), except that it does not block. If a matching dictionary is available, it will return that, but if there is none, it will simply return None (unlike take(), which will sit there twiddling its thumbs until a matching dictionary shows up).
|
|
You could, conceivably, have your own shared data structures simply by declaring some global variables outside of session(), but I recommend that you don’t. In order to make sure your data structures remain consistent, you would have to implement rules to make sure that no two threads fiddle with them at the same time ("mutual exclusion"), which can rapidly become extremely complicated. The Board is a variant on a data structure known as a Tuple Space, which already has mutual exclusion built into it. |
12. Lesson 5: Wherein we deal with input
Now that we have seen how to manipulate what appears on a client screen, we will turn our attention to the issue of input.
There are two basic ways of giving input to a Willow client: you can click things, and you can fill out text fields.
The lesson05.py code demonstrates both.
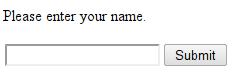
from willow.willow import *

def session(me):
  add("<p>Please enter your name.")
  add("<input id='name' type='text'>")
  add("<input id='go' type='submit'>")
  take({"tag": "click", "id": "go", "client": me})
  name = peek("#name")
  add("<p>Hello, %s." % name)

run(session)
This should initially display a screen that looks like so:
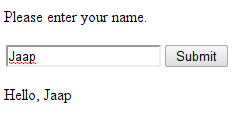
You can then type something in the text box and click the button labeled "Submit", and the screen will look like:
What’s going on here?
First of all, HTML elements that look like
<input type='submit' ...>
are buttons.
In HTML, each <input> element that is a button must have two attributes: type must be set to submit, to make sure we are displaying a button and not some other sort of input element, and value must be set to the text that is to be on the button (or, if it is left out, the text defaults to "Submit", or possibly something else if your browser is set up for a language other than English).
In Willow, your button must additionally have an id attribute, which is how we keep track of which buttons get clicked.
When a button gets clicked, a dictionary
{"tag": "click", "id":_id_, "client":_n_, "time":_t_}
is automatically posted onto the board, where
-
n is the number of the client that received the button click;
-
id is the id of the button;
-
t is the time in milliseconds since Jan 1, 1970 0:00 UTC, as measured by the client, when the button was clicked
This is why, after we have displayed the button, we can just call take({"tag":"click", "id": "go", "client": me}), which will block until the button is clicked. Note that if you insist on blocking one client thread until a button in some other client thread has been clicked, you can do that, simply by replacing me in the above call to take() by some other integer (but it is not recommended).
|
|
If the button is clicked multiple times, multiple dictionaries will be inserted. This may result in behavior you may not necessarily intend. If you want to wait for a button to get clicked that may have been clicked before you started waiting, you will need to clear those old dictionaries off the board using grab(). |
To show a text field, we use a piece of HTML that looks like
<input id='name_of_text_field' type='text'>
and then we call peek("#name_of_text_field"), which returns the current content of that text field. You can also use peek() for checkboxes, radioboxes, <textarea> elements, and most other input-type elements that you can read about in HTML books. In the above case, we only start looking for what’s in the field after the user has pressed the button.
13. Lesson 6: Wherein we poke around in other threads
Many of the Willow functions, even though by default they operate on the client display associated with the current session thread, can also operate on a different client display if you pass the client=n optional parameter. This is never necessary, but it may be more convenient than passing messages through the board to the other session thread so that it can then manipulate its corresponding client display.
Take for instance the code in lesson 4:
from willow.willow import *

def session(me):
  if me == 0:
    add("<h1>Monitor</h1>")
    while True:
      msg = take({"tag": "HELLO"})
      add("<p>Client %s logged in" % msg["number"])
  else:
    add(me)
    put({"tag": "HELLO", "number": me})

run(session)
We could rewrite that as follows:
from willow.willow import *

def session(me):
  if me == 0:
    add("<h1>Monitor</h1>")
  else:
    add("<p>Client %s logged in" % me, clients=0)
    add(me)

run(session)
|
|
Strictly speaking, the above programs are not entirely equivalent. If the first session thread executed very, very slowly and the second client connect immediately after the first, then the "Client 1 logged in" message could conceivably show up before the "Monitor" heading when running the second program, but not when running the first. |
14. Lesson 7: Wherein we stall for time
Look at this:
from willow.willow import *

def session(me):
  add("Hello, ")

  def ping():
    put({"tag":"PING", "client": me})
  background(ping, 3)

  take({"tag":"PING", "client": me})
  add("world.")

run(session)
It shows "Hello, " on the screen, and 2.3 seconds later, it adds " world."
That’s all there is to this one. Use the background(f,dt) function to call the function f in the background, after a delay in seconds of dt. Note that you can also use this (typically with dt=0) for any other background tasks, like dealing with a chatbox while the main task deals with the rest of the experiment.
15. Lesson 8: Wherein we finally produce data
from willow.willow import *

def session(me):
  add("Hello, world.")
  log("hello", "world", me)

run(session)
This is how you cause your Willow program to produce a data file.
In this case, a data file was produced in the log subdirectory (i.e. folder) called 2010-02-23-22-00-05.csv. The name is chosen automatically based on the date and time (year-month-day-hour-minute-second).
The file contains:
1266985186.84,hello,world,0
1266985187.28,hello,world,1
1266985187.55,hello,world,2
1266985187.76,hello,world,3
This is a CSV file, which is a simple text-file based spreadsheet format. It is understood by Excel, OpenOffice, Stata, and other data analysis software. You can also just open it in a text editor.
Each row will automatically get a timestamp added to the front of it, which is a large integer representing the number of seconds that have passed since the "Unix epoch" on January 1, 1970, 0:00 UTC. This may seem like an odd choice of timestamp format, but the advantage of this type of timestamp is that it makes sense to subtract them!
16. Lesson 9: Wherein we program our first experiment
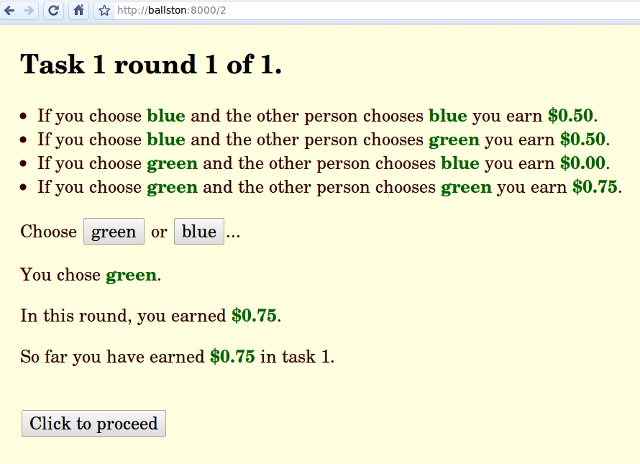
from willow.willow import *

def session(me):
  if me == 0:
    add(open("lesson09_0.html"))
    msg = take({"tag": "click"})
    bid = int(msg["id"])
    put({"tag": "bid", "amount": bid})
    show("#wait")
    add(bid, "#offer")
    msg = take({"tag": "accept"})
    accept = msg["accepted"]
    if accept:
      show("#accept,#pay")
      add(10 - bid, "#payoff")
    else:
      show("#reject,#pay")
      add(0, "#payoff")
    log("bid", bid)
    log("reaction", accept)
  elif me == 1:
    add(open("lesson09_1.html"))
    msg = take({"tag":"bid"})
    bid = msg["amount"]
    show("#offer")
    add(bid, "#bid")
    msg = take({"tag": "click"})
    accept = msg["id"]
    if accept == "accept":
      show("#pay")
      add(bid,"#payoff")
      put({"tag": "accept", "accepted": True})
    else:
      show("#pay")
      add(0, "#payoff")
      put({"tag": "accept", "accepted": False})
  else:
    add("<h1>Experiment is full.</h1>")

run(session)
<p>Pick an offer</p>
<div>
<input class="choice" id='0' value='$0' type='submit' />
<input class="choice" id='1' value='$1' type='submit' />
<input class="choice" id='2' value='$2' type='submit' />
<input class="choice" id='3' value='$3' type='submit' />
<input class="choice" id='4' value='$4' type='submit' />
<input class="choice" id='5' value='$5' type='submit' />
<input class="choice" id='6' value='$6' type='submit' />
<input class="choice" id='7' value='$7' type='submit' />
<input class="choice" id='8' value='$8' type='submit' />
<input class="choice" id='9' value='$9' type='submit' />
<input class="choice" id='10' value='$10' type='submit' />
</div>

<p class="hidden" id="wait">You offered $<span id="offer"></span>...</p>
<p class="hidden" id="accept">Player 2 accepted your offer!</p>
<p class="hidden" id="reject">Player 2 rejected your offer!</p>
<p class="hidden" id="pay">You earned $<span id="payoff"></span>...</p>
<p>Waiting for player 1...</p>

<div class="hidden" id="offer">
  Player 1 offered $<span id="bid"></span>...
  <input class="choice" id='accept' value='accept' type='submit' />
  <input class="choice" id='reject' value='reject' type='submit' />
</div>

<p class="hidden" id="pay">You earned $<span id="payoff"></span>...</p>
17. Lesson 10: In which we use strange input devices
Most of the time, you are going to want input from the mouse or the keyboard. Web browsers know how to talk to mice and keyboards, which makes it easy for Willow to get the input to you. Occasionally, you may have a need for more exotic input devices.
For instance, at GMU we use a device called the "Lumina Response Pad for MRI", manufactured by a company called Cedrus, which is a set of two boxes with two buttons each that you can hand to a subject inside an MRI machine. These boxes are hooked up to something called the "LSC-400 controller," which in turn hooks up to a PC using a serial (RS232) cable.
If you have an LSC-400, or any other device that talks to your PC using a serial cable, you may want to have a look at the file named willow/bb.py. This is a little stand-alone application that will read from a serial port and post each byte that comes in on that serial port onto the board.
To get this to work, start bb.py in a separate terminal, like so:
$ python bb.py
You can pass three optional arguments to bb.py, like so
$ python bb.py -p 2 -h localhost:8888 -t mytag
The first argument is the port number of the serial port (default 0), the second is the host and port number where willow is running (default "localhost:8000") and the third is the tag to use when bb.py posts things to the board… but here we’re getting ahead of ourselves, so let’s first have a look at some bb.py output.
Suppose we start bb.py and we push a button on our input device that causes some input to be sent in on the serial cable and we see this:
Reading data from port        : 0
Posting data to host          : localhost:8000
Using tag                     : serial
Received                      : 3
ERROR - no willow on          : localhost:8000
This means that bb.py accurately received a byte from the serial port, to wit "3", but it could not forward it to Willow, because it did not find an instance of Willow running on localhost:8000. Let’s start a Willow program that knows how to take serial input, in a separate window:
python lesson10.py
The code for this is simple:
from willow.willow import *

def session(me):
  while True:
    msg = take({"tag": "serial"})
    add("<li>%s" % msg["byte"])

run(session)
Now, we push some more buttons, and we see in the window where bb.py is running:
Reading data from port        : 0
Posting data to host          : localhost:8000
Using tag                     : serial
Received                      : 3
ERROR - no willow on          : localhost:8000
Received                      : 3
Posted                        : { "tag": "serial", "byte": "3" }
Received                      : 3
Posted                        : { "tag": "serial", "byte": "3" }
Received                      : 4
Posted                        : { "tag": "serial", "byte": "4" }
If we load a web browser and point it to localhost:8000, we now see input coming in from the serial device!
(If you happen to have an LSC-400, by the way, you’ll want to set the "mode" to "ASCII/MEDx" and the "speed" to "9600 baud". If you have some other input device, you may want to play around with Hyperterm on Windows or Cutecom on Linux to see how it works. If you can get it to work with Hyperterm or Cutecom but not with bb.py, you should read the documentation for the pyserial library and use that to hack on bb.py. Let me know!)
18. API: willow.willow
The selector argument can take any CSS selector. The CSS selector mini-language is rather rich, but the most typical cases are things like p (to get at all <p> elements), #a, (to get at the first element with id="a"), and .a (to get at all elements with class="a"). For more information, consult any book or web page on CSS. Whenever selector is omitted, the selector "body" is implied, which means you are referring to the entire body of the HTML document. Aside from CSS selectors, jQuery extensions are also allowed. The most useful is of the form selector:eq(n), which selects the n-th element that matches selector.
By specifying an integer, or a sequence of integers, for clients, you can operate directly on clients other than the one associated by default with the current session thread.
Whenever timestamp=True, you are requesting a tuple to be posted of the form {"tag":"timestamp","client":_n_,"time":_t_} that gives you a millisecond timestamp of when the action was executed by the client.
Whenever you specify the delay=dt option, the execution of that action is delayed by dt seconds (you can specify fractions of seconds, too). This is done on the client side with millisecond accuracy.
If you have lots of closely spaced delayed events, at some point the browser may start lagging; but in Google Chrome, I have gotten it up to a set() event every milisecond with only a very slight lag.
18.1. set(content, [selector], [clients], [timestamp], [delay])
Set the content of the HTML element(s) referred to by selector on to be content. Whenever content is a file descriptor that can be read from, the contents of the file are automatically substituted.
18.2. add(content, [selector], [clients], [timestamp], [delay])
Add content to the content of the HTML element(s) referred to by selector. Whenever content is a file descriptor that can be read from, the contents of the file are automatically substituted.
18.3. poke(attribute, value, [selector], [clients], [timestamp], [delay])
Change the value of attribute attribute to be value in HTML element(s) referred to by selector.
18.4. peek([selector], [clients])
Returns the value of the HTML <input> or <textarea> element(s) referred to by selector.
18.5. push(style, [selector], [clients], [timestamp], [delay])
Add the CSS style style to the HTML element(s) referred to by selector.
18.6. pop(style, [selector], [clients], [timestamp], [delay])
Remove the CSS style style from HTML element(s) referred to by selector.
18.7. hide([selector], [clients], [timestamp], [delay])
Hide the HTML element(s) referred to by selector.
18.8. show([selector], [clients], [timestamp], [delay])
Show the HTML element(s) referred to by selector, if previously hidden.
18.9. put(dictionary)
Post the dictionary onto the communication board.
18.10. take(*queries)
Block until a dictionary becomes present on the board that matches at least one of the queries, then remove and return it. A dictionary matches a query if it contains all the key-value pairs in the query (plus, optionally, some others).
18.11. grab(*queries)
If a dictionary is present on the board that matches at least one of the queries remove and return it; otherwise return None. A dictionary matches a query if it contains all the key-value pairs in the query (plus, optionally, some others).
18.12. run(session, [port])
This starts the Willow web server on the specified port (or port 8000 if you leave the second argument out). The web server will create a thread for each client that connects, and each thread will run the session function, passing as an argument the client ID.
Client IDs will be assigned sequentially, unless the URL is of the form http://whatever-host/n, where n is an integer, and n is not taken yet, in which case the client ID will be n.
If a client ID is requested that already exists, an attempt will be made to replay all messages previously sent to that client. This provides a limited amount of recovery from browser crashes. If the browser crashed while a peek or timestamp request was pending, this may not be sufficient. An attempt to fix that is in the works.
The web server will search for requested files in the current directory, among other places, so you can for instance include images in your pages.
18.13. background(fn, delay)
Run the function fn in the background (as a separate thread), with an initial delay specified in seconds. Fractions of seconds are allowed.
18.14. sleep(delay)
Wait for delay seconds. Fractions of seconds are allowed.
18.15. log(x,y,…)
Write (x,y,…) to the log file as a record, with the number of milliseconds since January 1, 1970 0:00 UTC prepended as the first column. A new log file is created in the log folder whenever the Willow library is loaded, and it bears a name based on the date and time when it was created. For instance, if Willow was invoked at 15:32:42 on February 2 of the year 2010, the file would be called log/2010-02-10-15-32-42.csv. This particular date-and-time format is used so that the files can be sorted by date/time. The log files are in CSV format and can be opened with a text editor or a spreadsheet program.
18.16. CSS features
Some Willow features are accessed by means of CSS classes:
- hidden
-
Any element that has class hidden turned on will start out hidden. You can call show() on it to make it appear. Example: <p>At the moment, you can<span class="hidden">not</span> trade widgets.</p>
- bait
-
Any element that has class bait turned on will automatically get the additional class mouse turned on whenever the mouse pointer is positioned over that element. This can be used to create "hover" effects.
18.17. Mouse clicks
When a button with (whether <input type="submit"> or <button></button>) or any element with class="clickable" is clicked, a dictionary like is inserted into the board automatically behind the scenes like so:
{"tag":"click", "id":_id_, "client":_n_, "time":_t_, "value":_val_}
where
-
n is the number of the client that received the button click;
-
id is the id of the button;
-
t is the time in milliseconds since Jan 1, 1970 0:00 UTC, as measured by the client, when the value was checked;
-
val is the contents of the text box
18.18. Key presses
When the user presses a key, a dictionary like is inserted into the board automatically behind the scenes like so:
{"tag":"key", "client":_n_, "time":_t_, "value":_val_}
where
-
n is the number of the client that received the button click;
-
t is the time in milliseconds since Jan 1, 1970 0:00 UTC, as measured by the client, when the value was checked;
-
val is the key pressed
19. Branch
This is an extension library. It is liable to change, much faster than Willow itself, and not be be as well documented and tested. But I don’t want to withhold it either. This documentation is generated directly from the branch.py source file.
19.1. assemble(session, clients=[], port=8000)
This function is a replacement for run(). If clients is not specified, it will display buttons on client 0 as clients 1, 2, … log on, which show subsets of the clients that have logged on so far. You can click one of these buttons at any time, and at that point, the function session() will be run once for each client IN THE SUBSET, with its client ID as the first number and the list of all client IDs IN THE SUBSET as its second argument. Clients that have connected but that are not in the subset will get a big X on their screens. The second way of using assemble() is to specify an explicit argument for clients=, some list of integers that indicates which clients you want. Once those client numbers have logged on, the session function is started once for every such client, and again any clients not in the set get a big X. === Examples ===
There is much additional useful code in the example_*.py files, which illustrate various ways to use Willow.
20. Appendix: A digression on your IP address
You need the IP address of your monitor computer in order for your client computers to connect to it. It would be convenient if Willow could display the right IP address for you to use, but unfortunately, this is easier said than done, since a computer can have multiple IP addresses at the same time: IP version 4 and IP version 6, on the wireless network, on the ethernet network, on the "loopback" network, and so on.
20.1. How to find your IP address on Linux
On Linux on my computer, I use the ifconfig command at the command line. When I enter
$ ifconfig
the computer responds
$ ifconfig
eth1      Link encap:Ethernet  HWaddr 00:23:ae:1e:9e:ac
          UP BROADCAST MULTICAST  MTU:1500  Metric:1
          RX packets:0 errors:0 dropped:0 overruns:0 frame:0
          TX packets:0 errors:0 dropped:0 overruns:0 carrier:0
          collisions:0 txqueuelen:1000
          RX bytes:0 (0.0 B)  TX bytes:0 (0.0 B)
          Interrupt:17

eth2      Link encap:Ethernet  HWaddr 00:24:2b:c6:a4:76
          inet addr:10.143.91.80  Bcast:10.143.91.255  Mask:255.255.254.0
          inet6 addr: fe80::224:2bff:fec6:a476/64 Scope:Link
          UP BROADCAST RUNNING MULTICAST  MTU:1500  Metric:1
          RX packets:10076 errors:0 dropped:0 overruns:0 frame:7868
          TX packets:10906 errors:20 dropped:0 overruns:0 carrier:0
          collisions:0 txqueuelen:1000
          RX bytes:1571308 (1.5 MB)  TX bytes:1341157 (1.3 MB)
          Interrupt:17 Base address:0xc000

lo        Link encap:Local Loopback
          inet addr:127.0.0.1  Mask:255.0.0.0
          inet6 addr: ::1/128 Scope:Host
          UP LOOPBACK RUNNING  MTU:16436  Metric:1
          RX packets:85540 errors:0 dropped:0 overruns:0 frame:0
          TX packets:85540 errors:0 dropped:0 overruns:0 carrier:0
          collisions:0 txqueuelen:0
          RX bytes:41237280 (41.2 MB)  TX bytes:41237280 (41.2 MB)
$
|
|
In this and many other software manuals, $ is used to indicate the Linux/UNIX prompt. On your computer, it may be different. % is a popular choice, too, for example. |
There is much information here, but we only need a little. First, notice that this computer has three network interfaces, called eth1, eth2 and lo. lo is the loopback device; it does not correspond to any actual hardware, but it is rather a contraption that the operating system uses so that you can make connections to your own machine at address 127.0.0.1 even when the network is down. The other two network devices are actual network cards that are in the computer; as it happens, eth1 is a wired Ethernet network, and eth2 is a wireless 802.11g network. According to the information above, the computer has IP address 10.143.91.80 on eth2, and it has no IP address on eth1, which makes sense, because the wired connection was not plugged when I executed the command. In the output above you can also see IP v6 addresses (labeled inet6 addr), but those are not commonly used.
20.2. How to find your IP address on Windows
Press WINDOWS+R (where WINDOWS is the "Windows Key", the one with the flag) to pull up a "Run Program" dialog, then enter cmd to get a command prompt window. Now enter ipconfig /a. This should give you all the information you need.
21. Appendix: Kiosk mode browsing
In order to prevent subjects from fiddling around with the web browser used to display a user interface to them, you can use a "kiosk mode" web browser. While several web browsers have kiosk modes, I have found that Google Chrome is the most convenient. On Linux, you simply use the command line google-chrome --kiosk instead of just google-chrome, and you get a full-screen browser without any extraneous bits of user interface that subjects might accidentally click on.
22. Appendix: Internals
— Blaise Pascal
The first thing that should strike you when looking at these files is that there’s not very much there. This is on purpose, and took a lot of work. It is my experience that the number of bugs per 100 lines of code is roughly constant, and that the best way of limiting the number of bugs is to limit the amount of code. (In the extreme case, of course that means that the only way to have no bugs is to write no code. This is not as vacuous an observation as it seems: it pays to think twice before deciding to turn something into a computer program in the first place.)
# Willow, a Python framework for experimental economics. Copyright (c)
# 2009, George Mason University. All rights reserved. Redistribution
# allowed under certain conditions; see file COPYING.txt

# WILLOW #############################################################
# This file is a library that you can use to write a server. You use
# such a server in combination with a client. The client is always a
# web browser displaying willow.html and running willow.js. None of
# this client-server business, however, is germane to the way you
# ought to think about writing a Willow application, though: you can
# write your application as though you were using a regular old GUI
# toolkit and there wasn't a client/server architecture or a network
# in the first place.

# The comments in this file are meant for people who have some
# experience with distributed systems and want to hack Willow
# itself. If you merely want to USE the Willow library to construct
# your own applications, read the manual instead.

import json, BaseHTTPServer, time, Queue, mimetypes, SocketServer
import threading, sys, csv, os, os.path, copy, re, stat


# LOGGING ############################################################

# This section provides the code that produces the output files, which
# go in the log/ directory.

# The file names for output files are constructed so as to work on all
# platforms. This means we use os.path.join to insert the right path
# separator, and we do not the ':' character, which has a special
# meaning on Windows (as in "C:\"). All output is unbuffered
# (bufsize=0) and synchronized on a single mutex. This code SHOULD be
# unicode-safe (important if we want to use it in, say, China), but I
# haven't tested that very much.

_log_fn = os.path.join("log",time.strftime("%Y-%m-%d-%H-%M-%S"))
_log_csv = csv.writer(open(_log_fn + ".csv","w",0))
_log_txt = open(_log_fn + ".txt", "w", 0)
_log_lock = threading.Lock()

tbl = []

def log(*msg):
  with _log_lock:
    _log_csv.writerow([int(1000*time.time())] + list(msg))
    tbl.append(msg)
  _trace("log",unicode(tuple(msg)))

def _trace(tag, *objs):
  with _log_lock:
    msg = "\n".join([ ("%s" % d) for d in objs ])
    out = ""
    for line in (msg + " ").splitlines():
      for i in range(0,len(line),70):
        out += "        " + line[i:i+70] + "\n"
    s = "%-4s %2d %s" % (tag, _me(), out[8:])
    lines = s.splitlines()
    if len(lines) > 10: lines = lines[:3] + ["..."]
    for line in lines: sys.stdout.write(line + "\n")
    _log_txt.write("%s\t%d\t%r\n" % (tag, _me(), msg))

def _trace_action(obj):
  tag = obj["action"]
  msg = "(%s)" % obj["selector"]
  if obj.get("timestamp", False):
    msg += " ...timestamp..."
  if obj.get("delay",0) != 0:
    msg += " ...%s..." % obj["delay"]
  if obj.get("css_class", "") != "":
    msg += " %s" % obj["css_class"]
  if obj.get("attribute", "") != "":
    msg += " %s=" % obj["attribute"]
  if obj.get("value", "") != "":
    msg += "%s" % obj["value"]
  if obj.get("content", "") != "":
    if len(str(obj["content"]))>50:
      msg += "\n"
    else:
      msg += " "
    msg += "%s" % obj["content"]
  _trace(tag, msg)


# TUPLE SPACE ########################################################

# The tuple space is for communication between session threads, and
# for asynchronous messages from the clients to the session
# threads. (Messages from the session threads to the clients go
# through a system of queues instead, which we will meet in the next
# session.) It allows you to write your program without shared state
# between threads, and thus without your having to worry about
# race conditions.

# Conceptually, the tuple space is a multiset of dictionaries, but
# Python doesn't have multisets, so we use a dictionary of
# dictionaries in which the keys are not really used for much of
# anything (they are simply sequentially assigned integers). All
# access to the tuple space is synchronized on a condition variable. A
# put() operation is a simple matter of inserting a value into the
# dictionary and waking up any threads that are blocking on take(). A
# deep copy is made of the inserted object to prevent a user from
# accidentally sharing data structures between threads by way of the
# tuple space; the whole point of the tuple space is to facilitate a
# shared-nothing archictecture in which the user need not be concerned
# with mutual exclusion! There are both blocking (take()) and
# nonblocking (grab()) functions for retrieving (and deleting)
# dictionaries from the space, and both of those invoke a simple
# linear search. To facilitate future extensions along the lines of
# the Metaweb Query Language (both faster-than-linear search if that
# turns out necessary and also more elaborate query constructs), I
# restrict keys in the dictionaries and in queries to be only strings.

_board_space   = {}
_board_counter = 0
_board_cv      = threading.Condition()

def put(item):
  with _board_cv:
    global _board_counter
    assert type(item) == dict
    assert all([ type(key) in [unicode, str] for key in item.keys() ])
    _trace("put", item)
    _board_counter += 1
    _board_space[_board_counter] = copy.deepcopy(item)
    _board_cv.notifyAll()

def _find(pop, *patterns):
  for number, item in _board_space.iteritems():
    for pattern in patterns:
      assert all([ type(key) == str for key in pattern.keys() ])
      if all([ k in item and item[k] == v for k,v in pattern.iteritems()]):
        if pop: _board_space.pop(number)
        return item
  return None

def take(*patterns):
  with _board_cv:
    _trace("take", *patterns)
    while True:
      item = _find(True, *patterns)
      if item != None: break
      _board_cv.wait()
    _trace("took", item)
    return item

def view(*patterns):
  with _board_cv:
    _trace("view", *patterns)
    while True:
      item = _find(False, *patterns)
      if item != None: break
      _board_cv.wait()
    _trace("veow", item)
    return item

def grab(*patterns):
  with _board_cv:
    _trace("grab", *patterns)
    item = _find(True, *patterns)
    _trace("grub", item)
    return item


# THREAD POOL EXTENSION TO THE PYTHON TCP SERVER #####################

# In order to get decent performance on Windows, we must improve a bit
# upon the standard Python TCP server. In particular, we replace
# SocketServer.ThreadingMixIn with a homebrew class.

# If you want to use the original, you can try this instead:
#
# class WillowPool(SocketServer.ThreadingMixIn): pass

class WillowPool:
  # By default, we create "non-daemon" threads.
  daemon_threads = False

  # The pool is a queue of available worker threads
  pool = Queue.Queue()

  # A new worker thread creates a mailbox (i.e. length-1 queue) in
  # which to receive assignments. It then goes to sleep, but it wakes
  # up whenever it gets an assignment. When it gets an assignment, it
  # does the server thing, and then adds itself to the pool to
  # indicate that it is available again.
  class Worker(threading.Thread):
    def __init__(self, server):
      threading.Thread.__init__(self)
      self.server = server
      self.mailbox = Queue.Queue(1)

    def run(self):
      while True:
        (request, address) = self.mailbox.get()
        try:
          self.server.finish_request(request, address)
          self.server.close_request(request)
        except:
          self.server.handle_error(request, address)
          self.server.close_request(request)
        self.server.pool.put(self)

  # When a request comes in, we try to get a worker from the pool. If
  # there are none, we make a new one. Then we tell the worker to
  # work.
  def process_request(self, request, address):
    try:
      worker = self.pool.get_nowait()
    except Queue.Empty:
      worker = self.Worker(self)
      worker.daemon = self.daemon_threads
      worker.start()
    worker.mailbox.put((request, address))


# WEB SERVER #########################################################

# The Willow web server is built on Python's BaseHTTPServer. It uses a
# new thread for each request, which is slow on Windows. A thread pool
# would be useful improvement. GET requests are served from the file
# system, but POST requests are special and assumed to come from
# willow.js. They come in three flavors: a newly connected client
# POSTs to /new first, requesting a client ID. On this occasion, a
# queue is created and inserted into the _clients dictionary
# (synchronized on a condition variable) keyed by the new client ID,
# and a session thread is started. The queue is for communication
# between the web server threads and the session thread. Once the
# client ID is determined it is sent to the client, which can now make
# to other kinds of POST requests. The first is to URL /put, and this
# simply lets the client put something on the tuple space. (The client
# objects are JSON data structures, which map directly onto Python
# data structures and no further processing is required.) The second
# type of POST request from the client is a request for commands, and
# these commands the web server gets from the queue corresponding to
# the client, where they are put by the session thread corresponding
# to the client. If multiple commands are on the queue, they are all
# sent to the client at once. The commands are assumed to be
# dictionaries and because they are sent in JSON, so conversion from
# Python comes (again) nearly free.

class Client:
  def __init__(self):
    self.queue = Queue.Queue()
    self.trace = []

  def send(self, msg):
    self.queue.put(msg)
    self.trace.append(msg)

  def replay(self):
    cancellation = Queue.Queue()
    self.queue.put(cancellation)
    cancellation.get()
    for msg in self.trace:
      self.queue.put(msg)

_clients = {}
_clients_cv = threading.Condition()

def run(session, port=8000):
  webroot = os.path.dirname(__file__) or os.curdir
  class Handler(BaseHTTPServer.BaseHTTPRequestHandler):
    def log_message(self, fmt, *arg):      pass

    def do_GET(self):
      fns = [ os.path.join(os.curdir, self.path[1:]),
              os.path.join(os.path.dirname(__file__), self.path[1:]),
              os.path.join(os.path.dirname(__file__), "willow.html") ]
      for fn in fns:
        if os.path.isfile(fn):
          mime = mimetypes.guess_type(fn)
          if type(mime) == tuple: mime = mime[0]
          if re.search(".js$", fn):  mime = "text/javascript"
          if re.search(".css$", fn): mime = "text/css"
          self.send_response(200)
          self.send_header("Content-type", mime)
          self.end_headers()
          self.wfile.write(open(fn).read())
          return

    def do_POST(self):
      self.send_response(200)
      self.send_header("Content-type", "application/json")
      self.end_headers()
      request_sz = int(self.headers["Content-length"])
      request_str = self.rfile.read(request_sz) + " "
      request_obj = json.loads(request_str)

      if self.path == "/new":
        with _clients_cv:
          if request_obj < 0:
            client = 0
            while client in _clients:
              client += 1
          else:
            client = request_obj
          self.wfile.write(client)
          if not client in _clients:
            _clients[client] = Client()
            thread = threading.Thread(target=session,
                                      args=(client,),
                                      name=str(client))
            thread.daemon = True
            thread.start()
          else:
            _iam(client)
            _trace("bork", " *** CLIENT %s RESTARTED *** " % client)
            _clients[client].replay()

      if self.path == "/put":
        _iam(request_obj.get("client",-1))
        put(request_obj)

      if self.path == "/do":
        client = request_obj
        _iam(client)
        queue = _clients[client].queue
        actions = []
        try:
            while actions == [] or not queue.empty():
              action = queue.get()
              if isinstance(action,Queue.Queue):
                action.put(0)
                raise Exception
              _trace_action(action)
              actions.append(action)
            self.wfile.write(json.dumps(actions))
        except Exception:
          pass

  class Server(WillowPool, BaseHTTPServer.HTTPServer):
    daemon_threads = True
    allow_reuse_address = True

  _iam(-1)
  _trace("run", "Willow is running on port %s" % port)
  Server(('', port), Handler).serve_forever()

def _me():
  return int(threading.current_thread().name)

def _iam(n):
  threading.current_thread().name = str(n)


# IO #################################################################

# This is where the bulk of the Willow API is: functions that do
# nothing but send a command to the client, which then processes the
# command in Javascript somehow. Documentation is in the manual. The
# one interesting point is that each session thread has one integer's
# worth of thread-local storage: the client ID of its corresponding
# client. That way, the user can call add(foo) rather than having to
# type add(foo,me) all the time.

def _action(object, clients):
  if clients == None: clients = _me()
  if type(clients) == int: clients = [clients]
  if "content" in object and type(object["content"]) == file:
    object["content"] = object["content"].read()
  if "content" in object: object["content"] = str(object["content"])
  if "value" in object: object["value"] = str(object["value"])
  for client in clients:
    _clients[client].send(object)

def add(content, selector="body", clients=None, timestamp=False, delay=0):
  _action({ 'action': 'add', 'content': content,
            'selector': selector,
            "timestamp": timestamp, "delay": delay }, clients)

def let(content, selector="body", clients=None, timestamp=False, delay=0):
  _action({ 'action': 'let', 'content': content,
            'selector': selector,
            "timestamp": timestamp, "delay": delay }, clients)

def poke(attribute, value, selector="body", clients=None,
         timestamp=False, delay=0):
  _action({ 'action': 'poke', 'attribute': attribute, 'value': value,
            'selector': selector,
            "timestamp": timestamp, "delay": delay }, clients)

def hide(selector="body", clients=None, timestamp=False, delay=0):
  _action({ 'action': 'hide',
            'selector': selector,
            "timestamp": timestamp, "delay": delay }, clients)

def show(selector="body", clients=None, timestamp=False, delay=0):
  _action({ 'action': 'show',
            'selector': selector,
            "timestamp": timestamp, "delay": delay }, clients)

def push(css_class, selector="body", clients=None,
         timestamp=False, delay=0):
  _action({ 'action': 'push', 'css_class': css_class,
            'selector': selector,
            "timestamp": timestamp, "delay": delay }, clients)

def pop(css_class, selector="body", clients=None,
        timestamp=False, delay=0):
  _action({ 'action': 'pop', 'css_class': css_class,
            'selector': selector,
            "timestamp": timestamp, "delay": delay }, clients)

_ticket_lock = threading.Lock()
_ticket = [0]
def peek(selector="body", clients=None):
  with _ticket_lock:
    _ticket[0] += 1
    ticket = _ticket[0]
  _action({ 'action': 'peek', 'selector': selector,
            'ticket': ticket,
            "timestamp": False, "delay": 0 }, clients)
  msg = take({"tag":"peek","ticket":ticket})
  return msg['value']


# THREADING ##########################################################

# The background() function allows the user to start a new
# thread. This adjusts the thread-local stored client ID so that you
# can still call add() etc from inside the new thread and they will
# know which client to operate on. It also takes an optional delay, so
# you can use this to schedule events. Otherwise, it's just your basic
# forking operation.

def background(function, delay=0):
  name = threading.current_thread().name
  def thunk():
    threading.current_thread().name = name
    function()
  threading.Timer(delay, thunk).start()

def sleep(delay):
  time.sleep(delay)
<!-- Willow, a Python framework for experimental economics. Copyright
 (c) 2009, George Mason University. All rights
 reserved. Redistribution allowed under certain conditions; see file
 COPYING.txt.  -->

<html>
  <head>
    <title>Willow</title>
    <script type="text/javascript" src="jquery.js"></script>
    <script type="text/javascript" src="json.js"></script>
    <script type="text/javascript" src="willow.js"></script>
    <link type="text/css" rel="stylesheet" href="willow.css" />
  </head>
  <body>
  </body>
</html>
/*
 * Willow, a Python framework for experimental economics. Copyright (c)
 * 2009, George Mason University. All rights reserved. Redistribution
 * allowed under certain conditions; see file COPYING.txt
 */

.hidden {
    display: none;
}
/*
 *  Willow, a Python framework for experimental economics. Copyright
 * (c) 2009, George Mason University. All rights reserved. Redistribution
 * allowed under certain conditions; see file COPYING.txt.
 */

$(document).ready(function(){
  /*
   * The preferred client ID is the URL if that is an integer, or else
   * 0. We will not know the actual ID until after we haved logged in.
   */
  var url = window.location.pathname.slice(1);
  var preferred_client = url ? Math.round(url - 0) + "" : "-1";
  /*
   * Now log in.
   */
  $.post("new", preferred_client, function(client) {

    /* At this point we are logged in, and we know the actual client
     * number. First, we will define a few helper functions, and then
     * we will start listening for server requests.*/

    /*
     * This function makes a call back to the server to post a
     * dictionary on the board. It is used both for requested (tag=peek)
     * and automatic (tag=click, tag=key) dictionaries. It decorates the
     * dictionary with two additional entries that indicate (i) client
     * number and (ii) a time stamp; these are used in all dictionaries
     * posted by the client, so we might as well just code them once.
     */
    function put(obj){
      /*
       * Keep in mind that client is a string and we want an integer
       * here, so subtract 0.
       */
      obj.client = client - 0;
      obj.time = (new Date()).getTime();
      $.post("put", JSON.stringify(obj));
    }

    /*
     * Catch keypresses no matter what is in focus and post them to
     * the board. We can do this once and for all, because all keypresses
     * accrue to the document object, and there is only one such
     * object. (Other event handlers are adjusted every time the page
     * content changes.)
     */
    $(document).keypress(function(e) {
      if (e.which)
  put({"tag": "key", "value": String.fromCharCode(e.which)});
    });

    /*
     * This function is to be called on newly inserted or modified
     * HTML elements. It makes sure that the correct event handlers are
     * bound. This works better than trying to use the jQuery system of
     * live events.
     */
    function decorate(elt) {
      /*
       * Key presses that happen when a text field is in focus
       * should be processed the normal way and should not result in
       * events being reported to the server.
       */
      var text_fields = elt.find("input:text,textarea");
      text_fields.keypress(function(e) {
        e.stopPropagation();
      });

      /*
       * When somebody clicks a button, or a "clickable" element, we
       * catch the click and report it.
       */
      var buttons = elt.find(":submit,:button,.clickable");
      buttons.unbind("click");
      buttons.click(function (e) {
        put({ "tag": "click",  "id": e.currentTarget.id});
      });

      /*
       * When an element is marked with class "bait", we want to
       * turn on class "mouse" whenever the mouse is over it. (This
       * is for implementing "hover" effects.)
       */
      var mousetraps = elt.find(".bait");
      mousetraps.unbind("mouseenter");
      mousetraps.unbind("mouseleave");
      mousetraps.bind("mouseenter mouseleave", function(e) {
        $(e.target).closest(".bait").toggleClass("mouse");
      });
    }

    /*
     * This function processes a list of commands received from the
     * server, and then immediately asks for more commands.
     */
    function action(cmds) {
      /*
       * Process each command.
       */
      for (i in cmds) {
        (function () {
          var cmd = cmds[i];
          function thunk() {
            switch(cmd.action) {
            /*
             * Most of the commands correspond directly to jQuery
             * methods; we call decorate() on the result to make sure that
             * new/modified HTML elements have the right event handlers
             * bound.
             */
            case "add":
              decorate($(cmd.selector).append(cmd.content));
              break;
            case "let":
              decorate($(cmd.selector).html(cmd.content));
              break;
            case "poke":
              decorate($(cmd.selector).attr(cmd.attribute, cmd.value));
              break;
            case "push":
              decorate($(cmd.selector).addClass(cmd.css_class));
              break;
            case "pop":
              decorate($(cmd.selector).removeClass(cmd.css_class));
              break;
            case "hide":
              $(cmd.selector).hide();
              break;
            case "show":
              $(cmd.selector).show();
              break;

            /*
             * The "peek" command is a request for the contents of
             * some input element to be posted to the tuple space.
             * jQuery has a method .val() that will get the content
             *  of all sorts input elements; quite convenient!
             */
            case "peek":
              var elt = $(cmd.selector);
        if (elt.size() > 0) {
      var val = elt.eq(0).val() || "";
        } else {
      var val = "";
        }
              put({"tag": "peek", "ticket": cmd.ticket, "value": val});
              break;
            }

            /*
             * All commands can come with an optional request for a
             * timestamp to be posted; the put() function puts on the actual
             * timestamp.
             */
            if (cmd.timestamp)
              put({ "tag":"timestamp" });
          }
          /*
           * If cmd.delay > 0, the request is for the command to be
           * scheduled rather than executed immediately; that's easy
           * enough to handle using window.setTimeout.
           */
          if (cmd.delay > 0) {
            window.setTimeout(thunk, 1000 * cmd.delay);
          } else {
            thunk();
          }

          /*
           * The use of an anonymous function that immediately gets
           * called may seem strange, but it's a workaround for Javascript's
           * dyslexical scoping (pun intended).
           */
        })();
      }

      /*
       * Request more commands. (At your service!) Note how the loop
       * works: we the action() function registers itself as a
       * callback. This is NOT recursion and will NOT overflow the stack.
       * This here trick, BTW, is known under various highfalutin names such
       * as "Comet" and "reverse AJAX".
       */
      $.post("do", client, action, "json");
    }

    /*
     * Request some commands to set the ball rolling.
     */
    action([]);
  });
});